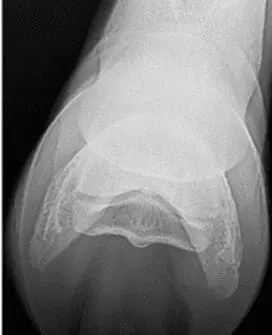
Equine radiography – the palmaroproximal-palmarodistal (‘skyline’) view of the distal sesamoidean (‘navicular’) bone
A case study explaining the indications, preparations and technique required to carry out a radiograph of the foot for equine practice.
Indications
• Investigation of lameness caused by foot pain (as determined by perineural anaesthesia).
• Pre-purchase examinations.
• Investigation of traumatic/penetrating wounds of the foot (especially the solar surface).
• Monitoring progression of disease.
Preparation
• Remove the shoe, if present.
• Ensure foot is trimmed to remove all loose horn.
• Ensure foot is picked out, clean and free from dirt.
• Pack the lateral sulci of the frog with Play-Doh (avoiding excess packing).
Technique


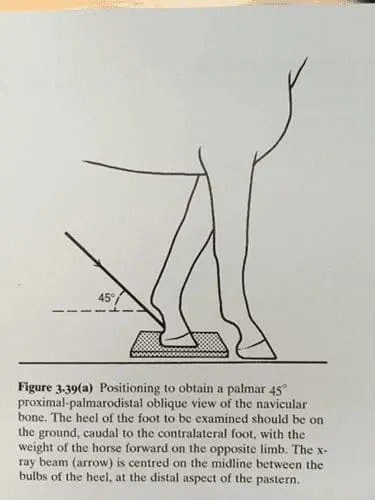
Image from Bulter, JA et al (2008) Clinical Radiography
of the Horse. 3rd ed. Chichester: Wiley-Blackwell
- Bring the limb to be radiographed caudally as far as possible and ensure the horse is bearing weight on the contralateral forelimb. (This may require sedation and/or regional anaesthesia if the foot pain is pronounced.)
- Place a reinforced cassette tunnel (with cassette in place!) under the foot to be radiographed, and position the foot towards the ‘caudal’ end of the cassette tunnel.
- Centre the beam between the heel bulbs and angle parallel to the flexor surface. (Approximately 45o.)
- N.B. This positioning may be difficult because:
- If the beam is angled too ‘upright’ the ergot becomes superimposed over the navicular bone.
- If the beam is angled to ‘low’ the flexor cortex is artificially thickened and its border with the medulla becomes less distinct, mimicking pathology.
- The generator will be positioned up against the body wall which can make correct positioning difficult or impossible in overweight animals.
